 Sash Window Secure Stop In Polished Chrome (Set of 4)
 Subtotal: £53.72 (incl. VAT)
There are a variety of questions our customers contemplate before purchasing some of our products. We have tried to answer as many of them as possible below, but please contact us if you have a question not answered below, we’re always happy to help.
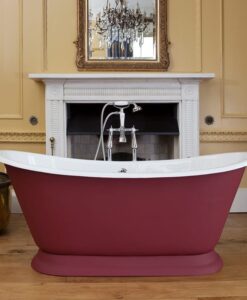
Please Note: Fireplace related questions can be found on our dedicated Fireplace website here.
General FAQ:
Which payment methods are accepted?
We accept a number of different payment methods including: Credit Card, Cheque, Paypal, Amazon Payments (pay through your Amazon Account), and Cash payments at our showroom.
What are the delivery charges & how do they work?
We offer delivery nationwide and internationally. Delivery charges vary depending on the product and sometimes the size of the order. This is due to some of the items coming straight from manufacturers who have their own varied costs, while others are hand delivered by or through us.
Generally Doors & Fireplaces cost around £85 to deliver nationwide, due to their weight and size. Smaller items range from £15-£35 nationwide. Feel free to contact us in regards to a local pickup to save on delivery costs.
International costs are very difficult to determine and depend on each specific order. If you would like to order from us outside of the UK, please get in touch about this.
What exactly happens after ordering?
Once you have processed and order online you will receive confirmation via email. We will then get in touch with you as soon as possible to discuss your order in further detail, and to ensure that all details are correct before processing. If you do not hear from us, please do not hesitate to get in touch.
Door FAQ:
Why should we choose you for stripping?
The majority of Victorian, Edwardian, or 1930’s interior doors have had many layers of paint throughout the years and eventually this leads to chipping and the loss of clarity of the beads which then looks untidy, even tatty.
Good quality commercial stripping is the answer – we use a hot dipping method, in clean tanks and with active chemicals, so minimizing the risk of warping and leaving the door completely ready for the next stage of renovation and repair if required.
It is sometimes said that the stripping process dissolves the glue in the joints of the door, however we have been stripping for over 30 years, using the correct procedure we have found that on the rare occasion that the joints have opened this is because they were already slightly open before. Re-gluing and clamping these resolves the problem of damaged joints.
Stripping of Previously Stripped Doors
Stripping of doors is fine provided they have the old lead based paint on them. If they have been stripped and repainted over the last few years they don’t strip properly. You can tell if this is the case as there will be only one or two layers of paint and the surface is more matt than gloss.
We generally can tell once we see the door, however it is not 100% foolproof. Once we start the process the item has to go though the process and will be chargeable no matter what the result. If a door has been stripped and then repainted it will leave either some or all of the paint on it, or it can lift a lot of the grain making it excessively time- consuming to sand.
Another problem we see is when the door has been stained and finished. The doors that have been finished in this manner are almost impossible to do anything with – in 99% ofdoor the stained finish simply will not be removed.
Be assured that we will always give an honest assessment of suitability – we always want to you to completely satisfied with the outcome of our door stripping.
How should I measure my door?
Firstly measure your existing door – height, width and thickness. Check that the door frame is square by measuring the door frame diagonally. If the frame is out of square you may need to order a slightly larger door and then trim it to size. A door is generally supplied very slightly oversized to allow some trim to fit.
Keep in mind that approximately 3mm clearance is required for the top and sides of the door and 5mm for the bottom, above the floor covering.
What type of Exterior Door frame do I need?
Exterior Door casings vary depending on the property. You may just have a single door frame similar to a Victorian, Edwardian or 1930’s and later type, which just holds the exterior door in place.
It could be a casing with an overhead glass panel above it which is rectangle or arched, which again is similar to the above types of properties.
It could be a casing with a side window known as a flag frame – one or two sides or it could be the all spectacular Victorian to Edwardian casing with flags either side and overhead.
Carry on and see our door shapes in the images – this will help you find the right one.
How do I fit my door when it is ready?
Firstly measure your present door including the thickness (depth) and check the door frame opening to ensure it is square. Select your new door. Remove the existing door and door furniture, supporting the door with wedges and always removing the top hinge screw last.
Next check the new door against the old door, or existing jamb for any variation in squareness. Plane the new door to the required height. Stand the door against the hinge stile in the opening. If it too wide, mark the corresponding jamb stile and then plane to fit.
Now measure, mark and check out hinges on the door stile. Drill screw holes and fasten hinges to the door. Stand the door against the hinge stile of the jamb in the open position, supporting the door with the wedges.
Fix the door to the jamb using at least 2 screws per hinge. Check the door swings freely with clearance. Remove the door and hinges and apply two coats of sealer to the top and bottom edges and hinge check outs. Re-hang the door fixing all screws into place. Fit door furniture according to the manufacturer’s instructions.
The door is now ready for painting or staining.
When do I finish the door and what finish should I use?
Finishing (paining) your Door:
All of our doors are original and go through a lengthy process to get to the pristine condition presented to you when complete. They are not finished and will require this process as soon as you possibly can.
This can be paint or varnish on the Exterior side of the door, and if not in a high traffic area, can be waxed ( However this will need a few coats to keep totally sealed ) or oiled on the inside, if preferred. The doors have met a standard for all finishes – however when painting you will find that you will need to adjust surface levels etc. using fillers i.e. ‘Polyfilla’ between coats.
Generally, a door should be primed and filled, undercoated and again filled, top coated for a good finish and this carried out within a couple of weeks after fitting – as soon as possible. If not the top coat then at least the primer and hopefully the undercaot. This seals the door to reduce any weathering. If you are unable to do this then you may see small cracks appearing – these will need filling with filler and priming. Please note filler does shrink back so you will need to build up the layers of filler when painting the door
Paint Finishes:
Paint finishes must be used on external doors. It is recommended that enamel paint be used on exterior doors. If the door is exposed to direct sunlight then it is best to avoid dark colours, to reduce the risk of heat distortion.
High gloss, satin or semi-gloss paints produce the best results. Apply one coat of primer to both faces, sand lightly in the direction of the grain. Apply another coat of undercoat and finsh with two coats of enamel colour.
Take care to properly seal the top, bottom and sides, including behind the hinges. Always follow the paint manufacturer’s instructions. The procedure for interior doors is the same, however enamel or acrylic paints can be used.
Stain Finishes:
Before applying stains all surfaces must be clean and dry. If light sanding is required, sand in the direction of the grain only.
Avoid cross sanding as this will only exaggerate when stained. Stains do not offer any protection against the elements, so a sealer must be used. Because staining is a specialised technique, the manufacturer’s instructions must be closely followed.
How do you prepare a door for finishing?
Doors that have been professionally stripped are not really wet as once the last coat of paint is disintegrating the doors are taken from the chemical tank and washed down leaving a damp surface which dries easily – we say around 5 days generally. We can tell a door is dry when we start to sand it – if the grain lifts then it is just not quite dry enough so we would leave it for another day.
Preparing the interior door:
Firstly we do any repairs to the ex locking and handle areas unless they are being re-used. Generally these repairs will be covered up by the new handles so will not to be seen, however it is always better to use old timber to make the repairs if possible.
Next we use a timber filler to fill each and every hole. Once dried we sand off the excess. We then orbital sand the body of the door and hand sand the panels and the beading – this is time consuming but the end result is outstanding.
Without repairs, the time taken on average to fill and sand a door is around 5 hours if the door is in good condition, and up to 8 hours if it is poor condition.
Natural timber finishes:
There are so many different ways to finish a door. Do you want it waterproof? Do you want it polished? Do you want a matt appearance or prefer a satin or glossy finish? Sometimes you can have the door finished on one side with one treatment and the other side can have a different effect. This can work well for instance with a bathroom door – waterproof on the inside and matt on the outside.
For waterproofing and for satin matt we are currently using a floor oil – it can in fact be used on any timber, floor or door. We can use a varnish also for waterproofing, which comes in all the finishes mentioned above. A matt polish finish is achieved with wax – we use Briwax for this, however it is not really recommended for high traffic or areas of damp such as the bathroom or kitchen.
If you are intending to apply your own finish always make sure you follow the instruction on the tin.
How should I care for my door?
It is important to be aware of the notes listed below when buying a Timber Door:
When ordering a glazed door (i.e stained glass panels or acid etched panel etc) the door has been fitted with sealants and putty on the outside of the door to protect it from weather – if the door is fitted the wrong way round it, is not protected and the guarantee will become void – please make sure it is fitted the correct way round – thank you!
Storage:
- Doors should only be delivered to site immediately prior to fixing.
- Where doors are to be stored for more than 2 weeks, they must be adequately sealed.
- Timber reacts to major fluctuations in temperature and moisture. Precautions must be taken to prevent this.
- The storage area should be well ventilated and not recently plastered.
- Doors should not be stored against external walls.
- Moisture content of timber doors should be kept even during storage and installation.
- Doors must not be stored in any part of a building where screeding, plastering or other wet trades are taking place, or are yet to take place. All completed wet work must be completly dried out.
- Extra care should be taken in centrally heated and air conditioned buildings.
Handling and Stacking:
- Store doors perfectly flat on level supports the full width of the door.
- One support must be laid across the centre and two others 300mm from each end.
- Bottom supports should be covered with cardboard and/or padding to prevent market to the door.
Installation:
- We strongly advise that no works be carried out or installers booked prior to the delivery and inspection of your goods.
- Glass must be unpacked by the customer within 24 hours of delivery. Inspection must take place prior to installation.
- If trimming doors, equal amounts of material should always be removed from each edge.
- Avoid the fitting of locks at rail joints.
- Doors must not be fitted to buildings where screeding, plastering or other wet trades are taking place, or are yet to take place. All completed wet work must be completely dried out.
- Low Modulus Neutral curing (LMN) silicone, compatible with edge sealants fro double glazed units, must be used for double glazed, leaded or encapsulated glass.
- Weatherbars are not fitted as standard but are essential for unsheltered installations to comply with guarantee conditions. They can be supplied on request.
Protection & Finishing:
- Doors are supplied in their raw (unpainted) state and must be sealed, knotted, primed or lacquered as immediately after delivery as possible. This sealing must be applied to all six surfaced – front/back face and all four edges.
- The primer is applied for transit purposes only and is not a final or waterproof coat.
- To obtain the best finish, any door – either raw or primed – will require normal surface preparation (light sanding/de-nibbing etc) prior to the application of further coats. Never use wire wool on oak doors. Beading mitres which may have dried back can be filled with decorator’s caulk.
- It is imperative that further coats of high quality finish be applied to manufacturer’s guidelines before the door is exposed to the elements and that this coating be maintained for the installed life of the door. This is particularly important in respect of the tops and bottoms of the door stiles where the grain is exposed. Failure to do this will lead to moisture ingress and swelling/warping.
- Painted doors should receive a minimum of 2 undercoats and 3 gloss coats.
- Edges of doors and other surfaces which have been cut must be sealed, particularly when exposing the end grain. This also applies to apertures caused when letting in hinges, locks, letter-places etc.
The door must be coated equally on all faces to allow a balanced movement of moisture. - We do not recommend the use of water based paints or polyurethane varnishes.
- Dark paint colours should be avoided on doors which are subject to direct sunlight.
Wood is a natural product and minor swelling or shrinking is not a defect but a normal characteristic of the material. This may occur due to variations in climatic and atmospheric conditions such as temperature and humidity. Adherence to the above points will help minimise these effects.
How should I care for my door furniture?
To help keep products looking good a simple cleaning routine of once a month should be sufficient. Where door fittings are external or in an exposed location they will require more regular maintenance which should also include a light oiling of the handle mechanism.
Polished Brass:
Do Not Use metal or spray polishes as the grit or solvents in these products may damage the finish.Wipe over with a soft non abrasive cloth and buff gently to a shine.
For all external fittings wipe over and sparingly apply a good wax polish, to avoid smears buff gently to a shine before the wax dries. he manufacturer uses high quality multi-resin lacquer coatings to help keep the brass fittings’ surfaces looking good.
Cleaned regularly the lacquer coating should provide you with good service but the life of the lacquer coating cannot be guaranteed.
Decorative Finishes:
Wipe over with a soft non-abrasive cloth and buff gently to a shine. For all external fittings, wipe over and apply a good wax polish sparingly. To avoid smears, buff gently before the wax dries.
Avoid wax polish on polished chrome, as this may cause smearing or bloom which can then be difficult to remove. Chrome plated products are hard-wearing finishes that are virtually maintenance free.
To remove finger marks on polished surfaces we recommend a light dusting with a soft non-abrasive cloth.
Glass FAQ:
How should I choose & measure for a bespoke glass design?
The process of choosing and measuring for glass doors can feel a bit overwhelming at first. Our website glass ideas gallery has many examples of our work. Feel free to call, email or come in with questions and we will be only too happy to help.
You can follow these steps to help choose and order stained, etched or simply clear glass.
Design:
Decide on the type of design you might like, keeping in mind that the more detail is involdved the more the finished door is likely to cost. You don’t have to know exactly what you want, but having some ideas will help us with designing your door. Things to consider:
– Is there a theme you love? Flowers, birds, abstract …..?
– Do you have an architectural style or period in mind? The age of your house and its other features could help guide your choice.
– Perhaps you can find a pattern in a book which could be modified if required. Don’t forget to look at our glass ideas gallery.
– Next try to get an idea of the colours you want to work into the design.
– Think about whether you would like to see through the glass or whether privacy is more important.
Size and Measuring:
– For windows you want the inside dimension where the glass will hang and the size of the bead to be used.
– For a door or sidelight you need the dimension of the glass you can see, from edge to edge and the size of the bead to be used.
– Anything rounded will need a more specific dimension.
Now it is time to order. We will now take a small deposit from you to hold your place in our design and make diary as we are always booked well ahead in our stained glass department. At this stage we slow the whole process down; our staff are now on hand to advise you and talk you through further detail on design, different colours etc, and provide a design illustration for you.
Sometimes we are able to show you the detailed drawings which will be used so that you can really see the overall effect, however we are almost at the point of manufacture here so time is tight.
Why does some stained glass contain imperfections?
Stained glass doors and windows were an integral part of many Victorian, Edwardian and later dated properties. The techniques for making them came perilously close to being lost, but have thankfully been revived in recent times. Many different techniques are used to make glass and these can lead to a number of imperfections such as an uneven tinting, odd colour hues, bubbles, cracking lines or ‘seeds’.
These were then always incorporated into the glass to artistic effect – the manufacturers of this specialised item experimented with the use of deliberate flaws and variations in the glass to add texture and realism to the design, and so sometimes the piece has what looks like hairline cracks in it – however this is never the case.
There are a number of different types of imperfections and here we point out a few:
Crown glass which makes the bull’s eye – no two are identical as each one is hand made and has a centre where the pointil (stick) has been pulled off leaving what sometimes looks like a hole. However, this never runs through the piece, instead it is just on the surface
Cylinder glass is blown in a hollow tube, cut down the centre and rolled flat, which leaves bubbles and lines known as seeding.
Antique Cathedral is a transparent, self-coloured glass which is rolled – leaving lines – and has an irregular and very dense surface.
Muffle glass sparkles and is getting harder and harder to come by. Especially in red colours, the tones can vary within a piece.
Rolled glass such as Muranse or Florentine is again difficult to purchase these days and again the colour can vary within the piece.
Spectrum is a glass that allows light to pass through it. It comes in a wide variety of colours and as there is even difference of tone within an individual piece, it is impossible to get two or more pieces which will be an identical match.
Heritage glass is mouth blown and has surface distortion- these leave seeds and surface markings.
Today stained glass is made using exactly the same methods and incorporates these ‘flaws’ to deliberately re-create the original look and feel.
Is stained glass safe in doors and side windows?
Traditional stained glass lead lights are often glazed in vulnerable/critical areas – doors, sidelights etc. and at low levels. BS6206 through to the Building Regulations of 2000 (approved document N1) are very clear in deeming traditional stained glass lead lights as safe (within the definitions of the regulations) and suitable for use in these areas provided that the small panes within the lead do not exceed specific sizes.
We find that some architects, surveyors and builders are incorrectly advising clients that only toughened, laminated or double glazing can be used in doors, sidelights and at low levels. The Building Regulations 2000 document, N1, clause 1.2 clearly states, ‘ Glazing in critical locations should either a) break safely or b) be robust or in small panes’. Also, in clause 1.5, ‘ In the context of this approved document a ‘small pane’ may be an isolated pane, or one of a number of panes contained within glazing bars, traditional leaded lights or copper lights.’
What about heat loss in stained glass panels?
We often hear a little bit of concern about potential heat loss from stained glass doors & the surrounding windows of a period entrance. The Building Regulations apply only to new doors and window frames, not to the re-glazing of older ones. They state that if the glass area is less than 50% of the door, (as with all of the doors on our website), or window frame, then single glazing, as in traditional stained glass lead lights, is sufficient. If the glass area is higher than 50% then a double glazed unit is required.
It may be conceivable to argue that where double glazing would not suit the character of the house, it is possible to have traditional stained glass lead lights and double glazing working together. There are various ways of achieving this to suit different situations.
View Our Latest Products!
-20%
£2,150.00 inc vat
Latest Finished Projects
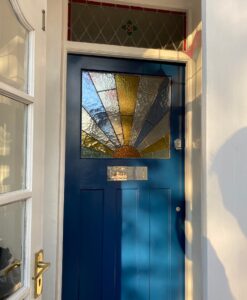
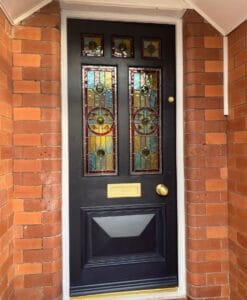
1930’s Stained Glass Door Supply & Install – May 2021 – Altrincham
Latest Finished Projects
Latest Finished Projects
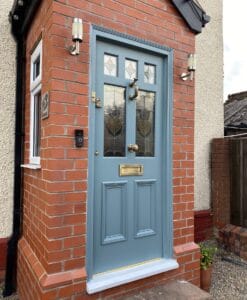
1930’s Stained Glass Door Supply & Install – November 2021 – Nelson Lancashire
Latest Finished Projects
Latest Finished Projects

Latest Finished Projects
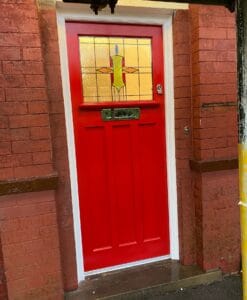
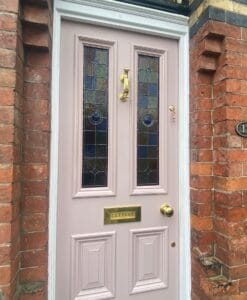
Stained Glass Door Install – April 2021 – Stretford Manchester
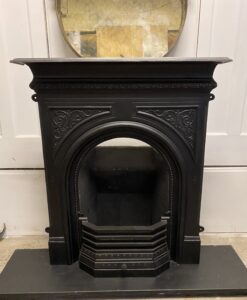
Original Reclaimed Fireplaces
£528.00 inc vat
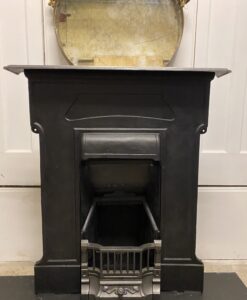
Original Reclaimed Fireplaces
£528.00 inc vat
Original Reclaimed Fireplaces
£504.00 inc vat